Jim Pfitzer's cover story about our "Locavore Thanksgiving"....
http://chattanoogapulse.com/current-issue/the-pulse-vol-7-issue-46/
Thursday, November 18, 2010
Saturday, October 30, 2010

Tuesday, September 7, 2010

Thursday, August 12, 2010

Farm-Infused City Dinner Menu August 7th 2010
To Start
Chinese Tea or Coffee City Chicken Eggs
With Velo Mexican coffee or black tea, Muddy Pond sorghum and Dominican cinnamon
Chinese Tea or Coffee City Chicken Eggs
With Velo Mexican coffee or black tea, Muddy Pond sorghum and Dominican cinnamon
Babaganoush
With William’s Island Farm eggplant and Niedlov’s baguette
With William’s Island Farm eggplant and Niedlov’s baguette
Link 41 Coffee Cured Bacon Sandwiches
With Alexzanna Farm tomatoes, Velo coffee and Niedlov’s Farmer’s Rye
With Alexzanna Farm tomatoes, Velo coffee and Niedlov’s Farmer’s Rye
The Feast
Chilled Zephyr Squash Soup
With William’s Island zephyr, swirled with roasted Signal Mtn Farm sweet pepper puree
Chilled Zephyr Squash Soup
With William’s Island zephyr, swirled with roasted Signal Mtn Farm sweet pepper puree
...........
Link 41 Smoked Ribs
From Sequatchie Cove Farm heritage pork
Jalapeno Cumberland Cornbread
With Tant Hill Farm jalapenos, Riverview Farms cornmeal, and Sequatchie Cove Creamery Cumberland
With Tant Hill Farm jalapenos, Riverview Farms cornmeal, and Sequatchie Cove Creamery Cumberland
Iced Sequatchie Cove Farm Cucumbers
With balsamic vinegar brought back from Modena, Italy after Terra Madre and handmade Caribbean sea salt
With balsamic vinegar brought back from Modena, Italy after Terra Madre and handmade Caribbean sea salt
Circle S Farm Yellow Wax Bean Salad
With William’s Island Farm Sungolds and oregano from my yard
To Finish
Velo Coffee Custard
With Daisy’s figs and city chicken eggs

-All beautiful and colorful wine glasses and water glasses are made by Prentice Hicks and donated for use during this dinner. They can be taken home, if desired, for $20 a cup and $25 a wine glass
-Various bowls (big and small), plates, and vases (small and big) are made by Anderson Bailey, and are also donated for use during this dinner. They may be taken home as well, please ask for prices.
-Many of the gorgeous serving bowls are by Danielle Fox, as well as a few cups, plates, and smaller bowls. They are donated for use during this dinner and may also be purchased, ask for prices.
-All the beautiful flowers are grown, harvested and lovingly arranged by Padgett Arnold.
-Of course this dinner would have been nothing but empty plates and stomachs without our dedicated and hardworking farmers and artisans- William’s Island Farm, Sequatchie Cove Farm and Creamery, Circle S Farm, Tant Hill Farm, Alexzanna Farm, and Riverview Farms, Link 41, Velo Coffee Roasters and Niedlov’s Bakery were all extremely important in the making of this dinner. They are all at Main Street Farmer's Market- along with many other farms producing equally delicious produce and meat.
And last, but decidedly not least- thanks to all of you, the eaters, who choose to make this community better and more alive everyday. I look forward to seeing you all at the Main Street Farmers Market throughout the season!
With William’s Island Farm Sungolds and oregano from my yard
To Finish
Velo Coffee Custard
With Daisy’s figs and city chicken eggs

Featuring (and Many Thanks to)….
-All beautiful and colorful wine glasses and water glasses are made by Prentice Hicks and donated for use during this dinner. They can be taken home, if desired, for $20 a cup and $25 a wine glass
-Various bowls (big and small), plates, and vases (small and big) are made by Anderson Bailey, and are also donated for use during this dinner. They may be taken home as well, please ask for prices.
-Many of the gorgeous serving bowls are by Danielle Fox, as well as a few cups, plates, and smaller bowls. They are donated for use during this dinner and may also be purchased, ask for prices.
-All the beautiful flowers are grown, harvested and lovingly arranged by Padgett Arnold.
-Of course this dinner would have been nothing but empty plates and stomachs without our dedicated and hardworking farmers and artisans- William’s Island Farm, Sequatchie Cove Farm and Creamery, Circle S Farm, Tant Hill Farm, Alexzanna Farm, and Riverview Farms, Link 41, Velo Coffee Roasters and Niedlov’s Bakery were all extremely important in the making of this dinner. They are all at Main Street Farmer's Market- along with many other farms producing equally delicious produce and meat.
And last, but decidedly not least- thanks to all of you, the eaters, who choose to make this community better and more alive everyday. I look forward to seeing you all at the Main Street Farmers Market throughout the season!

Tuesday, July 20, 2010
When in Doubt, Alliterate
When I first started cooking I used to drive my mother crazy with my quirky experiments in flavor combinations. I would try to see how many spices I could use, how much sweet could go with that bitter, or what crazy way I could twist a traditional dish. It came partly from the trend that was happening, and still is, where "fusion" and experimentation are more hip and important than where the food actually comes from or preserving it's true taste. But it also came from the simple fact that I was learning. I had to experiment and really get to know what goes with what and why and how before I could actually make it work. You just can't believe what other people say or write when you are fifteen years old; you have to do it your darn self. You have to find the delicate edge between too much salt and not enough with your own tongue, not trust a recipe. And if you get the wild idea that blueberries might be good with beets, the only way to find out is to try it. I have come to respect the art of cooking simply and try with every meal to achieve a perfect fresh balance. It's really, really hard to make each ingredients shine as bright as they should without muddying them up with spices or tricky sauces. There is a very fine line between bland and fantastic and it is an art to draw out the personality of every vegetable, hunk of meat, and piece of fruit so that they not only stand alone but also mingle harmoniously with their bowl-mates, whoever that may be. Only sometimes do I feel like I have achieved this and it is a wonderful feeling to do justice to the hard work the plants, animals and farmers put into each ingredient. I won't pretend that I can do that well yet, I still stumble all over the place and over-flavor all the time. Of course, it is impossible to cook well and simply without good food, and good food gives you such an advantage. And every now and then I revert completely back to my wild and crazy days of basing meals on the first letter of the ingredient, or the color of the food (I made an all black meal once that really wasn't half bad....) I believe that it is impossible to be a bad cook, you just have to lose all fear and listen to the food. (and shop from your local farmers because they do the hardest part- growing stuff that tastes amazing all by itself)
Baked Beets with Blue Cheese, Blackberries and Blueberries

I've often made roasted beet and raspberry salad with feta or blue cheese. There really isn't any difference here except that all ingredients start with "b".
For four people:
- 6-9 medium sized beets, sliced into wedges (skin on)
- 1 cup blue cheese of your choice (mine was from undisclosed sources and very good, but Greenlife has a nice selection), crumbled or diced
- 3/4 cup blueberries
- 3/4 cup blackberries
- salt to taste
- oil
Bratwurst and Brown Rice

- 1 cup short or sweet (or combo) brown rice
- 2 cups water
- Pinch of salt
- 2 Link 41 brats, sliced
Friday, July 16, 2010
Sungolds, Sweat, and Pink-Eyed Peas
O I've been here. I've been sushi rolling, cheese making, cheese sellin, chicken tending, weed pulling, bean pickin, blueberry eating, river swimming here. I've also been cooking as well, I just haven't found the time to sit down and tell anyone about it.....

I would have said, back in my younger more naive days, that summer was my favorite season for food, if not just because of tomatoes. Now that I am more mature I can tell you that although beets are wonderful, cabbage is delicious, and butternut squash is what angels must dine on, summertime food is the BEST. I do love all the other seasons, nothing says late spring like the cool sweet crunch of a sugar snap pea or autumn like butternut tortellini. But eggplant, tomatoes, basil, cucumbers, and pink eyed peas? The Main Street Farmer's Market is dazzlingly dizzyingly full of these wonders. It is begging me to get my glass jars down from the cabinets and get to "putting stuff away". But right now I'm just eating it. This is the easiest and most fun time of year to eat entirely seasonally and locally. If I didn't work in a grocery store I wouldn't even remember what the inside of one looks like!

 Cover the peas, onion, and garlic in water and bring to a boil. Turn down to a simmer and let cook til done, about 15-20 minutes. Salt to taste and let cool. Remove peas, onions and garlic from liquid and toss with Sungolds, basil, and olive oil. Serve chilled or at room temp.
Normally I slice all the veggies by hand because I think it looks nicer. Grating works just as well though, and it's a lot quicker.


I would have said, back in my younger more naive days, that summer was my favorite season for food, if not just because of tomatoes. Now that I am more mature I can tell you that although beets are wonderful, cabbage is delicious, and butternut squash is what angels must dine on, summertime food is the BEST. I do love all the other seasons, nothing says late spring like the cool sweet crunch of a sugar snap pea or autumn like butternut tortellini. But eggplant, tomatoes, basil, cucumbers, and pink eyed peas? The Main Street Farmer's Market is dazzlingly dizzyingly full of these wonders. It is begging me to get my glass jars down from the cabinets and get to "putting stuff away". But right now I'm just eating it. This is the easiest and most fun time of year to eat entirely seasonally and locally. If I didn't work in a grocery store I wouldn't even remember what the inside of one looks like!

Sungolds and Pink-Eyed Peas
for four people- 3 cups shelled fresh pink-eyed peas (buy as many as you can and freeze them, seriously)
- 1 small onion, diced
- 3 cloves garlic, rough chopped
- 2 cups Sungold cherry tomatoes, half of them halved and the other half left whole (how's that for a tongue twister?)
- 1 bunch basil, chopped
- 1/4 cup olive oil, or less
- Salt to taste

Cumberland Cheese Grits
- 1 cup Riverview Farms grits
- 4 cups water (or 2 c water and 2 c beer)
- 2 garlic cloves, minced
- Pinch of salt
- 1/2-3/4 cup shredded Sequatchie Cove Creamery's Cumberland cheese

Chard and Beet Slaw
Normally I slice all the veggies by hand because I think it looks nicer. Grating works just as well though, and it's a lot quicker.
- 1 bunch chard, or any other green thing you can find (what did I tell you about those greens?), thinly sliced
- 1 large, or 2 small beets, grated
- 1 small summer squash, grated
- 2 small carrots, grated
- Large drizzle of honey
- Large pinch of salt (you want it to get everything good and soft)
- Splash of vinegar

Wednesday, June 16, 2010
Eating Seaonally (You Gotta Eat Your Greens!)
When I was in Dominica for four months this winter, I had a lot of time on my hands. I also had a lot of crayons and that led to a lot of greeting card making, which led to writing a children's book. The title was There's a Chicken in my Kitchen!. It was about growing up on a farm- through a young ten-year-old girl's (my) eyes. It was divided into four chapters- spring, summer, fall, and winter, with a section in the back with corresponding recipes. There were two vegetable stories per chapter- along with one animal story and one story about the seasons (swimming in the river, dirt and bugs, etc). Spring-time I had a story titled- You Gotta Eat Your Greens! and it was all about... yep, how we gotta eat our greens. And trust me, you might think you're sick of them now- wait til mid-summer and an edible leaf is nowhere in sight.

The other week at the market I met a very nice elderly couple who had just heard about the market and were there "checking it out". They had walked around, viewed the kohlrabi, kale, collards, lettuce, radishes, beet greens, and cabbages and said to me as they left, "We sure are glad we know about this! We'll have to come back when the vegetables start coming in".

Now, before you say anything, don't even try to pretend you don't know what they're talking about. They are talking about the good stuff- the okra, summer squash, cucumbers, and best of all, tomatoes. Now that the weather is sweltering and sticky, we are ready for the food to fit the season. But this is part of learning what the season IS. Although it may feel like August, it's still (barely, but still) June, and we are yet a little way from the rich, ripe overflow of tomatoes and cucumbers. The squashes are peeking through the present greens, and are very welcome. Green beans are coming in, potatoes are being dug, onions are being pulled before the solstice. But still the kale, collards, cabbages, and radishes are hanging to the last threads of cool morning air, and we should make the best of it. The great thing about new foods coming in is that the old ones are completely changed. Brand new recipe ideas pop up as potatoes mingle with the radishes- roasted and tossed with dill, mustard, and olive oil. Summer squash is thinly sliced and added to a cabbage slaw. Steamed green beans and caramelized onions can completely change your ideas about kale. Sauteed zucchini will be mixed with chopped basil and thinly sliced chard that has been wilted in balsamic...
These are my favorite times of food-seasons, when the old overlaps with the new. The flavors of everything suddenly change and open up new ways of not only cooking the foods, but also experiencing the tastes. I love it when spring meets summer and when summer meets fall. It's like a new season comes at the PERFECT moment, just when you think you are tired of the old one, an opportunity comes where you can fall in love all over again. It creates these wonderful little mid-seasons, almost like individual seasons themselves. This would never, ever happen if we could pick and choose what we wanted, whenever we wanted it. Sometimes it is a bit challenging to keep cooking that darned old kale week after week, when all you want is a tomato. But if you stick with it, the rewards are beyond amazing. You grow to really know what the food tastes like, and learn to cook in ways that ten stacks of cookbooks could never teach you. It takes a real commitment to cook entirely seasonally and to not give up on the kale before it gives up on itself. But, as Carlo Petrini said, it is the waiting that makes food taste so good- the longing, the suspense. It is also the dedication of hanging on to the end. True love is never gained without full commitment and joy.

....... .......
Even if your refrigerator looks like this:
....... .......
Here's to the brand new market season!
Tuesday, June 8, 2010
Kinda-Sorta Kimchee, or, What to do With All Those Veggies
I just received the Main Street Market letter and saw the post on A Strange Grace, a blog attached to the email, about kimchee and remembered- O yeah, I wanted to do one of those too. I don't make real Korean kimchee and don't pretend to. I just ferment seasonal vegetables because they are really, really good like that. Grace's little short history is nice, I would recommend reading it. My inspiration comes from Wild Fermentation- a "cookbook" that I would say is an absolute MUST for every single person who has ever met and loved vegetables. I have gone through many fermentation phases, including miso, but the fermented root veggies is a phase that never stops. You can ferment almost anything, as Sandor will tell you. In this batch pictured below I actually had some green beans from Crabtree that produced themselves a bit early. I really love broccoli and snap peas too. Kohlrabi is wonderful and crunchy, beets turn everything a nice fushia, radishes are really good whole, and garlic scapes are beyond amazing. Just experiment and don't be afraid. As far as I can tell nothing will kill you, it might just not taste that good....
Wild Fermentation can actually be purchased now at Greenlife- the last time I saw it it was on the beer brewing shelf. It can also be bought through Chelsea Green Publishing, and I'm sure on Amazon. Both Sandor's site and Chelsea Green are on the sidebar of this blog
 What I usually do:
Take a HUGE pile of veggies- greens, roots, stalks.... I have heard that un-fresh stuff can be used but personally I can taste that in the finished product, the veggies just don't sparkle as much if they aren't really fresh. Wash them all but don't worry too much about the dirt, but only if it is local and organically produced. A little dirt is good for us- in fact, Sandor has a recipe for eating it in his other book The Revolution Will Not be Microwaved, which is also very worth owning (and I am in it for a brief moment, or at least my very moldy salame is). Chop everything as you like it. I usually do a variation of slices and rounds. Small radishes are super yummy left whole, and I even left some teeny tiny beets from Circle S Farm whole in my last batch. Sometimes, if two vegetables are similar in color or texture (if you use beets or even pink radishes everything will turn pink anyway), I cut them into different shapes, just so I'll know what is what when it's all done. For instance, last time I cut the kohlrabi into sticks and the daikon into rounds.

Make a paste of finely chopped (by hand or in the food processor) ginger, garlic, and chilies. This part is all up to you, depending on how spicy or strong tasting you like it. The tastes mellows a WHOLE lot, so use three times as much as you think you need. I really don't like it too spicy, but I do like a lot of ginger and garlic. For one gallon I usually use two or three heads of garlic and a large hunk of ginger. I add about three dried chilies- string up and dry this summer's chilies in your kitchen and you will have enough all winter and next spring-long to make whatever you want with them. In Wild Fermentation, the recipe tells you to first soak the veggies in a brine of 3 T salt to 4 Cups water (un-chlorinated). Then you pour off and save the brine, mix the softened veggies with the ginger-garlic paste, and pack them into a jar or crock. If the moisture drawn out of the veggies does not cover them by the first day or so you add back a little brine. I have started skipping the first step and just adding a little brine to the raw veggies tossed with paste and packed in a jar. They only problem with this is that it is harder to control how salty the veggies will be and how much moisture will come out of them. I end up having brine overflow onto the counter, even if I only added a teeny bit. If you have never done this, read Wild Fermentation, and don't follow my advice.

Whatever you ferment the stuff in, you have to be able to fit something inside to weigh down the veggies, to both help press their juices out and to keep them from floating up and being exposed to the air, and thereby getting moldy. When I do small 1 gallon batches I use a glass wine or other booze bottle full of water to act as a weight. It does not fit entirely snug into the jar, there is some wiggle room, but I have never had a problem. I prefer to use bottle withOUT a punt, just so no veggies hang out up in there. (Wild Fermentation has several other suggestions). Cover the whole thing with a cloth to keep out bugs and dust and set in a cool dark corner to ferment. Taste everyday. You can skip the tasting the first few days if you don't like salty veggies, but the magic will happen either quickly or slowly, depending on how cool your corner is. The hotter it is the more salt you should use and the quicker the fermentation happens. The kimchee can be left out until it is as pungent as you'd like it. Once it tastes perfect, stick it in the fridge and enjoy for as long as it lasts. It is very nice as an after dinner digestif.

The veggies I used for this one:

Then, yesterday I just made another batch. I didn't have any garlic or ginger so I used layered tons of William's Island Farm garlic scapes and some whole and ground dried chiles with:

Wild Fermentation can actually be purchased now at Greenlife- the last time I saw it it was on the beer brewing shelf. It can also be bought through Chelsea Green Publishing, and I'm sure on Amazon. Both Sandor's site and Chelsea Green are on the sidebar of this blog

Take a HUGE pile of veggies- greens, roots, stalks.... I have heard that un-fresh stuff can be used but personally I can taste that in the finished product, the veggies just don't sparkle as much if they aren't really fresh. Wash them all but don't worry too much about the dirt, but only if it is local and organically produced. A little dirt is good for us- in fact, Sandor has a recipe for eating it in his other book The Revolution Will Not be Microwaved, which is also very worth owning (and I am in it for a brief moment, or at least my very moldy salame is). Chop everything as you like it. I usually do a variation of slices and rounds. Small radishes are super yummy left whole, and I even left some teeny tiny beets from Circle S Farm whole in my last batch. Sometimes, if two vegetables are similar in color or texture (if you use beets or even pink radishes everything will turn pink anyway), I cut them into different shapes, just so I'll know what is what when it's all done. For instance, last time I cut the kohlrabi into sticks and the daikon into rounds.

Make a paste of finely chopped (by hand or in the food processor) ginger, garlic, and chilies. This part is all up to you, depending on how spicy or strong tasting you like it. The tastes mellows a WHOLE lot, so use three times as much as you think you need. I really don't like it too spicy, but I do like a lot of ginger and garlic. For one gallon I usually use two or three heads of garlic and a large hunk of ginger. I add about three dried chilies- string up and dry this summer's chilies in your kitchen and you will have enough all winter and next spring-long to make whatever you want with them. In Wild Fermentation, the recipe tells you to first soak the veggies in a brine of 3 T salt to 4 Cups water (un-chlorinated). Then you pour off and save the brine, mix the softened veggies with the ginger-garlic paste, and pack them into a jar or crock. If the moisture drawn out of the veggies does not cover them by the first day or so you add back a little brine. I have started skipping the first step and just adding a little brine to the raw veggies tossed with paste and packed in a jar. They only problem with this is that it is harder to control how salty the veggies will be and how much moisture will come out of them. I end up having brine overflow onto the counter, even if I only added a teeny bit. If you have never done this, read Wild Fermentation, and don't follow my advice.

Whatever you ferment the stuff in, you have to be able to fit something inside to weigh down the veggies, to both help press their juices out and to keep them from floating up and being exposed to the air, and thereby getting moldy. When I do small 1 gallon batches I use a glass wine or other booze bottle full of water to act as a weight. It does not fit entirely snug into the jar, there is some wiggle room, but I have never had a problem. I prefer to use bottle withOUT a punt, just so no veggies hang out up in there. (Wild Fermentation has several other suggestions). Cover the whole thing with a cloth to keep out bugs and dust and set in a cool dark corner to ferment. Taste everyday. You can skip the tasting the first few days if you don't like salty veggies, but the magic will happen either quickly or slowly, depending on how cool your corner is. The hotter it is the more salt you should use and the quicker the fermentation happens. The kimchee can be left out until it is as pungent as you'd like it. Once it tastes perfect, stick it in the fridge and enjoy for as long as it lasts. It is very nice as an after dinner digestif.

The veggies I used for this one:
- Signal Mountain Farm bok choy (mainly the white part and some of the green)
- William's Island Farm and Crabtree Farm garlic scapes
- Crabtree Farm green beans
- Circle S Farm spring onions and teeny beets
- Crabtree Farm kohlrabi and beets
- William's Island Farm Hakurai Turnips
- Sequatchie Cove Farm Easter Egg Radishes
- and.......Helios Radishes from my own yard!

Then, yesterday I just made another batch. I didn't have any garlic or ginger so I used layered tons of William's Island Farm garlic scapes and some whole and ground dried chiles with:
- William's Island Farm daikon and turnips
- Circle S Farm broccoli
- Crabtree (or Sequatchie Cove, I don't remember) Farm kohlrabi

Sunday, June 6, 2010
June Celebration Dinner Menu

To Start
Chilled Soup
With Crabtree Farm kohlrabi and Williams Island Farm leeks and garlic scapes
William’s Island Farm Leg of Lamb Sandwiches
On Niedlov’s Farmer’s Rye with William’s Island Farm arugula pesto and Sequatchie Cove Creamery’s Cumberland cheese
Wontons filled with Link 41’s Lamb Sausage
OR
Sequatchie Cove Farm Shiitake
Both with William’s Island Farm nappa cabbage
The Feast
William’s Island Farm Lamb
Braised with William’s Island Farm garlic scapes in red wine
Cold Soba Noodles
Tossed with roasted Crabtree Farm beets, Circle S Farm spring onions,
Signal Mountain Farm fennel bulb and handmade black bean miso
Roasted William’s Island Farm Daikon and Hakurai Turnips
with cilantro from my yard
William’s Island Farm Nappa Cabbage Slaw
With Signal Mountain Farm radishes and Sale Creek Honey
To Finish
Chocolate Beet Cake
With Crabtree Farm beets, Scharffen Berger chocolate, and a Sequatchie Cove Farm strawberry sauce

Featuring (and Many Thanks to)….
-All beautiful and colorful wine glasses and water glasses are made by Prentice Hicks and donated for use during this dinner. They can be taken home, if desired, for $20 a cup and $25 a wine glass
-Various bowls (big and small), plates, and vases (small and big) are made by Anderson Bailey, and are also donated for use during this dinner. They may be taken home as well, please ask for prices.
-A few of the plates and vases are made by Danielle Fox. Unfortunately there was a mishap in her last firing and she was not able to donate as many pieces (beautiful serving bowls) as we hoped. Her few pieces are donated for use tonight and available for purchase as well.
-All flowers are done by our gracious and talented hostess Eleanor Cooper.
-Of course this dinner would have been nothing but empty plates and stomachs without our dedicated and hardworking farmers- William’s Island Farm, Sequatchie Cove Farm and Creamery, Circle S Farm, Signal Mountain Farm, Sale Creek Honey, and Crabtree Farm were all extremely important in the making of this dinner. They are all at Main Street Farmer’s Market- along with many other farms producing equally delicious produce and meat.

And last, but decidedly not least- Many thanks to all of you, the eaters, who choose to make this community better and more alive everyday. I look forward to seeing you all at the Main Street Farmers Market throughout the season!

Saturday, May 22, 2010
Recipe- Sorrel and Spinach Bisque
I kind of took this from Seasons of My Heart by Susanna Trilling. It is a roasted poblano bisque in the book, but I liked it because it uses ricotta, or requeson, in the recipe. I had a whole lot of ricotta because Nathan made me some. Well, he didn't actually make ME some, he just had to make some to make a starter culture for a cheese he was making. Ricotta, or requeson literally means "re-cheesed" because that's what it is. It is made out of whey, which if you know anything about making cheese, or Little Miss Muffet, you would know that whey is what comes out of the milk when you make cheese. Usually the curds are all you worry about and the rest of the whey goes to the pigs. But sometimes, when you really feel like it, the whey can be heated super hot and, if you add an acid (like lemon juice or vinegar), even more cheese will come out of the whey. It has very tiny soft curds and we call it ricotta. Nathan gave me the pile of ricotta and used the totally de-cheesed whey to make his starter....
Of course, all the vegetables are available at the Main Street Farmer's Market. I can't say how long the sorrel and spinach will be around. Alexzanna Farms has had sorrel the past few weeks and most everybody has had some kind of spinach, onions, or garlic scapes. Unfortunately the milk and ricotta will have to be outsourced because they are not yet available at the market (and probably won't be anytime soon, you just have to be really lucky/good at squeegeeing the cheese-house floor to get some of the real good stuff).


Saute the onions and garlic scapes in butter in a soup pot over medium heat til the onions are soft. Add the stock and bring to a simmer. Throw in the leaves and cook til wilted. Stir in salt, pepper, and cayenne. Cool slightly, then blend in blender til smooth. (I don't have a blender, just a food processor, so nothing ever gets quite smooth enough). Mix about 1/2 cup of the mixture in with the ricotta in a bowl. Add the ricotta mixture to the soup and blend again. Pour mixture back into the pot and whisk in the milk. Heat back up or cool it off to serve chilled. Taste for salt and spice- a little jazzing up might be necessary. If serving chilled, let cool at least three or four hours. If serving hot, serve right away.

Of course, all the vegetables are available at the Main Street Farmer's Market. I can't say how long the sorrel and spinach will be around. Alexzanna Farms has had sorrel the past few weeks and most everybody has had some kind of spinach, onions, or garlic scapes. Unfortunately the milk and ricotta will have to be outsourced because they are not yet available at the market (and probably won't be anytime soon, you just have to be really lucky/good at squeegeeing the cheese-house floor to get some of the real good stuff).

- 1 large pile torn fresh spinach leaves (maybe five cups)
- 1 smaller pile torn fresh sorrel leaves (maybe three cups)
- 1/2 to 1 cup chopped spring onions
- 3-4 garlic scapes, chopped small
- 1 tablespoon butter
- 1 quart stock (I used lamb because that was the first thing I saw in the freezer. Chicken or veggie would work just as well)
- 1 cup milk
- 1/2 cup ricotta
- Pinch of ground cayenne
- Salt and pepper to taste

Saute the onions and garlic scapes in butter in a soup pot over medium heat til the onions are soft. Add the stock and bring to a simmer. Throw in the leaves and cook til wilted. Stir in salt, pepper, and cayenne. Cool slightly, then blend in blender til smooth. (I don't have a blender, just a food processor, so nothing ever gets quite smooth enough). Mix about 1/2 cup of the mixture in with the ricotta in a bowl. Add the ricotta mixture to the soup and blend again. Pour mixture back into the pot and whisk in the milk. Heat back up or cool it off to serve chilled. Taste for salt and spice- a little jazzing up might be necessary. If serving chilled, let cool at least three or four hours. If serving hot, serve right away.

Tuesday, May 4, 2010
Waiting for Wednesday (and the proverbial Asparagus)
So, it's Tuesday night and I'm down to the last few spinach leaves, and scrounging for any radishes that might have rolled under the produce drawer. Every week I load up on produce, thinking that I never could possibly eat half of what I can't stop myself from buying, and end up getting so excited about it that I use most of it in the first meal. Spring is the best because I feel like I have been starving myself for the past four months- scraping by on potatoes and frozen and canned goods from the summer before. (of course this winter I spent eating avocados and mangoes in a tropical paradise, but that market story is another tale altogether). So when the time comes I try to eat as much greenery as a grass-fed cow. Lacking the extra stomachs, I end up eating about half the greenery. But I make sure those morning grits or fried egg are topped with kale, or collards, or something that tastes like it's been alive in the past few days.
The Main Street Farmer's Market is officially opening (I think) this Wednesday, but it has been going on all winter. I have been living from lamb chop to lamb chop, duck eggs to overwintered collards, and finally to glory be!- all the produce my heart desires. Arugula, spinach, asparagus (to supplement my own growing in my yard- don't tell Suzanna, or she won't sell me any), kale, sausages, radishes, beets, carrots, lettuce, herbs, grits and cornmeal, shittake, and even bamboo shoots have been blessing my every meal for the past few weeks. I feel like I have come out of a desert and fallen into an oasis. I no longer look longingly at the various produce on the grocery shelf, knowing that even if I buy it it won't have the same wonderful taste as in-season, locally grown stuff will. I HAVE the in-season locally grown stuff all the time now, right at the edge of my knife and the tip of my tongue. And I could not be more content, not even if I were a pig in a waller....
Lamb Chops with Grits and Greens
for two- four people
 I like this meal because it is what any busy home-cook wants. It is quick, easy, and impressively delicious.
Start the grits first- they should take about twenty minutes. Bring the water to a boil, then whisk grits in gradually. Lower heat to a simmer. Add salt and cook, stirring now and then, til thickly bubbling. Add the greens and stir til wilted. Stir in half the herbs and pepper to taste, and serve topped with remaining half herbs.
Start lamb chops when grits are about 10 minutes from finished. Heat a cast iron skillet til very hot. Sprinkle chops generously with salt and pepper. Sear lamb chops briefly on either side and set aside on a plate. Pour wine or beer into skillet to "deglaze", or take off any bits sticking to the pan and to get the yummy lamb juices up and mingling with the wine or beer. Add the chops back to the skillet, throw in the garlic, and cook in oven for about seven minutes. If they are firm-ish when poked with a brave finger, the chops are done. The katahdin lamb that Williams Island Farm raises is almost impossible to mess up- it seems to be tender and moist even if well-done. But I would recommend medium-rare (which is when the meat is still has a little give when poked, but not too soft).
Serve with warm grits and a fresh lettuce, arugula, spinach, or combination of all, salad.
The Main Street Farmer's Market is officially opening (I think) this Wednesday, but it has been going on all winter. I have been living from lamb chop to lamb chop, duck eggs to overwintered collards, and finally to glory be!- all the produce my heart desires. Arugula, spinach, asparagus (to supplement my own growing in my yard- don't tell Suzanna, or she won't sell me any), kale, sausages, radishes, beets, carrots, lettuce, herbs, grits and cornmeal, shittake, and even bamboo shoots have been blessing my every meal for the past few weeks. I feel like I have come out of a desert and fallen into an oasis. I no longer look longingly at the various produce on the grocery shelf, knowing that even if I buy it it won't have the same wonderful taste as in-season, locally grown stuff will. I HAVE the in-season locally grown stuff all the time now, right at the edge of my knife and the tip of my tongue. And I could not be more content, not even if I were a pig in a waller....
Lamb Chops with Grits and Greens
for two- four people

- 1 cup Riverview Farm grits
- 1 large handful chopped or torn kale, collards, chard, or any other green thing you like- from any or all farms that have them
- 1 bunch chopped scallions, or other herb of your choice
- 4 cups water, or chicken broth made with River Ridge Farms chicken
- Salt and Pepper to taste
- 1 packet Williams Island Farm lamb chops (there are usually four to a pack- they are so tiny that I like to give one person two apiece)
- Salt and Pepper
- 1/2 cup red wine or dark beer
- 4-6 cloves garlic, peeled but whole- optional
Start the grits first- they should take about twenty minutes. Bring the water to a boil, then whisk grits in gradually. Lower heat to a simmer. Add salt and cook, stirring now and then, til thickly bubbling. Add the greens and stir til wilted. Stir in half the herbs and pepper to taste, and serve topped with remaining half herbs.
Start lamb chops when grits are about 10 minutes from finished. Heat a cast iron skillet til very hot. Sprinkle chops generously with salt and pepper. Sear lamb chops briefly on either side and set aside on a plate. Pour wine or beer into skillet to "deglaze", or take off any bits sticking to the pan and to get the yummy lamb juices up and mingling with the wine or beer. Add the chops back to the skillet, throw in the garlic, and cook in oven for about seven minutes. If they are firm-ish when poked with a brave finger, the chops are done. The katahdin lamb that Williams Island Farm raises is almost impossible to mess up- it seems to be tender and moist even if well-done. But I would recommend medium-rare (which is when the meat is still has a little give when poked, but not too soft).
Serve with warm grits and a fresh lettuce, arugula, spinach, or combination of all, salad.
Wednesday, April 28, 2010
Recipe- Pork Shoulder
I really don't eat or cook that much meat. I like it alright, I just never get a hankerin' for it that often. But when I do, the things I like cooking best are the slow-cooking, braising types. I like beef shorts ribs, chuck roasts, and pork shoulders. Pastured and forested pork is so amazingly flavorful by itself. But it also picks up new flavors really well, so it is easy to make a shoulder complex, rich and flavorful without doing much of anything. I also like to braise meats because the longer they cook, the better. I always get so worried about overcooking a dry-roast beef roast or a baked chicken. When something is slow-braised you can throw it in a low oven and know that four hours is even better than two....
It is very very important that the quality of the meat is good. Never try to do this with anything that comes from a grocery store (unless it's Greenlife and it's Sequatchie Cove meat). The Main Street Farmer's Market has two beef vendors and three pork (and one lamb, but that's a different story). My rule for eating meat is that I have to at least have met the farmer who raised the animal, if not the animal itself. I never eat meat outside of that, and wouldn't DREAM of buying anything other than local, grass-fed, happy-lived meats. It would be a waste of time and money, not to mention all the other stuff that I won't mention.
for six people (or less than that, but with leftovers):


-preheat oven to around 350 degrees F
Throw the herbs etc in the bottom of a large dutch oven-style pot. I have a big Le Cruset that I cook just about everything in. A tight lid and heavy pot are all that is important. Put the shoulder(s) in and generously salt and pepper them. Pour liquid over everything. You don't have to cover the meat, it should just come about half-way up. Put lid on your pot and throw it in the oven for at least two and a half hours. Longer is better, but not too long (like not until the liquid has evaporated and the house is burning down). The meat should be very tender, not tough, when you poke it. If it is still tough it will be very dry because the magic hasn't happened yet. With all meat, there is a gray-area in between magics. Either you cook meat quickly til it is barely done, or you cook it forever til it is very done. Even if it is cooked in liquid it will be dry if you try to pull it out too early.... I like to check it every hour or so to see how it is doing. If the liquid has dried up, add more.

If you want to save the braising liquid to pour over the pulled meat, take the meat out of the pot and pour the liquid into a container and put it in the refrigerated for several hours. There will be a LOT of fat on it, and cooling it is the easiest way to get it off; it rises up and hardens and you can just scoop it out. There should still be fat on the shoulder roast, cut it off and do with it what you will. It is important to leave on while cooking because it helps keep the meat moist and tasty. The easiest way to get the meat ready for eating is to pull out all the bones- they should slide right out- and pull the meat with your hands or forks into bite-sized shreds. Serve with or without the liquid with cornbread, grits, rice, or whatever else you happen to love.

It is very very important that the quality of the meat is good. Never try to do this with anything that comes from a grocery store (unless it's Greenlife and it's Sequatchie Cove meat). The Main Street Farmer's Market has two beef vendors and three pork (and one lamb, but that's a different story). My rule for eating meat is that I have to at least have met the farmer who raised the animal, if not the animal itself. I never eat meat outside of that, and wouldn't DREAM of buying anything other than local, grass-fed, happy-lived meats. It would be a waste of time and money, not to mention all the other stuff that I won't mention.
for six people (or less than that, but with leftovers):

- 1 medium sized pork shoulder- around five pounds- fat intact
- 2 heads garlic
- large handful of herbs- I used oregano and thyme, but anything works
- 2 dried chilies (fresh work just as well, in the summer when they're in season)
- liquid of some kind (I like to use different fruit juices and/or alcohol. This time I used pear juice and mead. Beer, white wine, or cider are also good, as are apricot nectar or pineapple juice - whatever you have)
- Salt and pepper

-preheat oven to around 350 degrees F
Throw the herbs etc in the bottom of a large dutch oven-style pot. I have a big Le Cruset that I cook just about everything in. A tight lid and heavy pot are all that is important. Put the shoulder(s) in and generously salt and pepper them. Pour liquid over everything. You don't have to cover the meat, it should just come about half-way up. Put lid on your pot and throw it in the oven for at least two and a half hours. Longer is better, but not too long (like not until the liquid has evaporated and the house is burning down). The meat should be very tender, not tough, when you poke it. If it is still tough it will be very dry because the magic hasn't happened yet. With all meat, there is a gray-area in between magics. Either you cook meat quickly til it is barely done, or you cook it forever til it is very done. Even if it is cooked in liquid it will be dry if you try to pull it out too early.... I like to check it every hour or so to see how it is doing. If the liquid has dried up, add more.

If you want to save the braising liquid to pour over the pulled meat, take the meat out of the pot and pour the liquid into a container and put it in the refrigerated for several hours. There will be a LOT of fat on it, and cooling it is the easiest way to get it off; it rises up and hardens and you can just scoop it out. There should still be fat on the shoulder roast, cut it off and do with it what you will. It is important to leave on while cooking because it helps keep the meat moist and tasty. The easiest way to get the meat ready for eating is to pull out all the bones- they should slide right out- and pull the meat with your hands or forks into bite-sized shreds. Serve with or without the liquid with cornbread, grits, rice, or whatever else you happen to love.

Tuesday, April 20, 2010
The Seasonal Cure For Seasonal Ails

Everywhere I go I hear people complaining of "their allergies". 'Tis the season for thick yellow pollen. And it's been very thick this year- due to our abnormally dry spring. People are red-eyed and sneezing, cursing the spring weather instead of welcoming it. Of course, this happens every spring and doesn't really have much to do with the dryness. It might be worse this year but it's always THAT-BAD. I have always had the belief that the more exposed people are to seasonal pollen, the less likely they are to be affected by it. "Allergy" has become a misused term in our language, and although I will not explain in depth now why I believe that, I still do believe it.
There are real allergies. Some people are allergic to peanuts, or shellfish, or eggs. Although I think it may be possible that there has been some kind of long-term genetic build-up to these allergies through generations of eating habits I never doubt that they are very,very real. But when I hear people say they are suffering from "seasonal allergies" I just can't help but say:

(o yeah, and play outside more)
The last two springs I have worked inside the semi-sterile kitchen of Greenlife. I spent much of my spring time under florescent bulbs. I would go out in my yard after work and plant flowers, pull weeds, and inspect the pollen build up on my car. But I wasn't working constantly out in the air all day, and I must admit that I got scratchy eyes and sneezes and tight sinus-y feelings.
This year is different. I am trying harder to be outside more often. But I am also drinking this Magic Elixir called Wild Nettle Tea. We drink it every day and I seriously have sneezed, oh, maybe six times this spring. Nettles are supposed to be amazing for millions of different things. They are in tons of natural hair and skin products. They are traditionally eaten in season in many countries, like Ireland, England, and those other cool-ish places. You can steam them and eat them as any other green, distill them into a hair tonic, or drink them as an "allergy fighting tea".
The thing is, the tea kind of tastes like pot likker, and wild nettles sting. So you have to be very very careful (use tongs) when transferring them to your tea jar. And I like to add things that make the tea taste better. I have lemon balm and mint growing in my yard, and I use a local (namely Sale Creek Honey) honey as a sweetener. This adds a little Allergy Attack bonus, since local honey is supposed to cure all allergy ale's too.

I have heard from SO many people (health nuts, believers, and non-believers alike) that this is the best, best, best way to combat those "seasonal allergies". Synthetic medicines and pills just don't cut it if you want your body to build up a true, strong immunity. The thing that we sometimes don't think about is the fact that maybe this pollen isn't out to get us, we have just lost the lifestyle and diets needed to work with it. We need to be co-existing with the world we live in, not combating it.

Wild Nettle Tea
- 1 handful lemon balm-preferably from your yard or your neighbor's- dirt attached is ok and highly sought after, as we might need more dirt in our diets anyway
- 1/2 handful mint, also from local yard (if you plant mint it will be everywhere forever)
- 2 tong-fuls wild nettle- available in local woods or at the Main Street Farmer's Market from Alexzanna Farms
- Large drizzle of local honey, also available at the Main Street Farmer's Market from Sale Creek Honey
Saturday, April 17, 2010
Recipe- Mayonnaise
I never, ever buy mayonnaise. I don't really use it that often. I use it in deviled eggs or egg salad, and sometimes I get a hankering to use it on a sandwich or two. So when I need it I just make it. I have no idea why it is a terrifying thing to make- I think that legend must have come from people who don't buy good, fresh, truly free range eggs. If you have those eggs then all of your wildest egg dreams are possible. If you don't, well, just don't try to make any "tricky" egg dish or sauce. In fact, just don't use eggs at all. It's not worth it.

Supposedly this can be done in the blender even more easily. I don't have a blender so I couldn't tell you....
When I was at Ballymaloe Cookery School part of our 'semi final exam' was exhibiting the cooking skills we had learned over the past three months. The night before I studiously/anxiously sharpened my filleting and boning knives, worried that I would be requested to fillet a round fish (landlubber that I am I had only filleted about five round fish in my life) or bone a leg of lamb. Lucky for me I ended up having, in a very quiet room and carefully watched by three teachers, to make pie pastry, mayonnaise, and a poached egg. If I can make mayonnaise while being scrutinized then anyone can. I have terrible stage fright.


- 1 whole "good egg" from any farmer at Main Street Farmer's Market -room temp
- 1 egg yolk -room temp
- 1 teaspoon good mustard (homemade mustard is really super easy to make; I just use my friend Ashley's homemade stuff)
- 1 1/2 tablespoons lemon juice (or any kind of acidic liquid will do- like vinegar)
- 3/4 - 1 cup olive oil OR a mixture of olive oil and vegetable oil of your choice- sunflower is good
- nice pinch of salt
- 1 teaspoon herbs, garlic, or whatever you want to flavor it with (optional)
Supposedly this can be done in the blender even more easily. I don't have a blender so I couldn't tell you....
When I was at Ballymaloe Cookery School part of our 'semi final exam' was exhibiting the cooking skills we had learned over the past three months. The night before I studiously/anxiously sharpened my filleting and boning knives, worried that I would be requested to fillet a round fish (landlubber that I am I had only filleted about five round fish in my life) or bone a leg of lamb. Lucky for me I ended up having, in a very quiet room and carefully watched by three teachers, to make pie pastry, mayonnaise, and a poached egg. If I can make mayonnaise while being scrutinized then anyone can. I have terrible stage fright.

Tuesday, April 13, 2010
When I Was a Duck Mom....
My friend Ashley from William's Island Farm raises ducks. Well, she used to raise them, back in the day when the weather was warm. Her first batch was brought up in a yome on an island with no running water or electricity. If you have ever been a poultry mom you would understand that the lack of those two resources are a little trying for raising young poultry. So for this go-round she recruited me and my trusty help, Mike, to be the parents of twenty young Indian Runner ducklings.
 I knew the drill, I've raised chicks out at Sequatchie Cove many a time. You notify the local post office that a very loud and slightly moving cardboard box will be arriving ANY DAY NOW in the post, and to call you when it comes. The post office loves this- after days of sorting Netflix and water bills, young fowl is a welcome and exciting diversion.
Here on Lookout Mountain I was a little wary of informing them about my upcoming package. But Steve, the postman, was well learned in the ways of young birds. A man in Rising Fawn ALWAYS orders chicks, he assured me. You have to dip their beaks in water ASAP, he said, they are ok at first because they have been living off their eggs, but by the time they get to the post office they are hungry and thirsty, they need to be taught where to get water.

I concluded that I was in good hands but woke up every morning for four days, staring at the phone, waiting for the post office to call. When they finally did we ran out the door, coffee-less, and carefully put the peeping box in the back seat. We rushed home and dutifully dipped each teeny beak in water and watched the ducklings as they stumbled around their new home. We had prepared a kiddie pool with pine wood chips, a feeder, a grit plate, and a waterer for the young'uns. The wood chips were covered with the latest Sunday New York Times; carefully picked pages to educate our flock on the latest styles and travel spots. The newspaper was to keep the little birds from confusing the chips as food and choking on them. All that night we heard wee peeps coming from the downstairs bedroom as the ducklings ran circles around their new home under the heat lamp, their flat little feet pattering on the newspaper.

Ducks are NOT chickens and ducks LOVE water. After realizing half of their allotted drinking water was used in splashing their neighbors, we set a little pan in their house so that they could play in it at their will. They took turns leaping in and swimming around, their tiny paddles furiously churning as they peeped and splashed contently. Of course, this play time was limited and there was always a life guard on duty. We didn't want any drowning to happen on our watch.

There was some inspection, but the young ducks soon learned, one at a time, that THIS was the place to be.

And they packed it in, getting the most out of their short allotted "play time".

I am assuming that I now know a little bit about being a parent. Baby ducks poop, play, demand food at very high volume, and sleep like they might be dead.

They don't hold "normal" hours like the rest of us. They eat when they're hungry, drink when they're thirsty, and peep when they feel like it it. Two AM is not the wrong time for a loud and crazy "peep show'.

But everyone grows up and wants to sleep on the roof of their house. Soon, the ducks became bigger and more experimental. One followed the other until they got their roof privileges taken away.

They usually were confined to the kiddie pool full of wood chips, but every now and then we had to change those soggy (due to excess playing) wood chips and they got to play in the bathtub while that happened.
Unfortunatly for them, the whole tub wasn't full of water. They had to be content with the plain-ol'-pool.

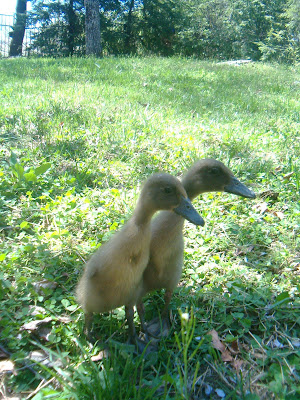
A few very special and well behaved duckling were even allowed outside as they grew larger (this takes about a week).

These ducks love to forage. They love collards and kale, lettuce stems and chickweed, clover and grass. After they got over the concern for their fellow ducklings they immediatly took to being out on an open range.
But after three weeks, their cute little bodies morphed into teen-age awkwardness. Their down began to turn to little rough pin-feathers. Their tails that they wag so happily like little duck-dogs were sprouting one-two-three tail feathers. Suddenly their kiddie-pool was no longer the large open circular range that they knew in their youth; they were ready to fly the coop.

Ashley, I left on the William's Island voicemail, their peeps have almost turned to quacks. It's time to take your ducks to pasture.
It was true. In the morning when we went down to greet the angry waterless mob there were some strange croaking murmurings in the crowd. They weren't exactly quacks yet, more like sick bronchitic croaks.

They're monsters, Mike said
.
They're teenagers, I said. Their voices are changing and so are their bodies. They are growing up. This is not the end, it's just the beginning of something else.

They'll never be as cute as they were, but one day they will be sleek and business-like in their new suits of feathers. They will still be the same busy ducks running from food to water, grabbing whatever weed or bug comes their way. And their big green eggs will make the most delicious custards and souffles. I just know it.

Here on Lookout Mountain I was a little wary of informing them about my upcoming package. But Steve, the postman, was well learned in the ways of young birds. A man in Rising Fawn ALWAYS orders chicks, he assured me. You have to dip their beaks in water ASAP, he said, they are ok at first because they have been living off their eggs, but by the time they get to the post office they are hungry and thirsty, they need to be taught where to get water.

I concluded that I was in good hands but woke up every morning for four days, staring at the phone, waiting for the post office to call. When they finally did we ran out the door, coffee-less, and carefully put the peeping box in the back seat. We rushed home and dutifully dipped each teeny beak in water and watched the ducklings as they stumbled around their new home. We had prepared a kiddie pool with pine wood chips, a feeder, a grit plate, and a waterer for the young'uns. The wood chips were covered with the latest Sunday New York Times; carefully picked pages to educate our flock on the latest styles and travel spots. The newspaper was to keep the little birds from confusing the chips as food and choking on them. All that night we heard wee peeps coming from the downstairs bedroom as the ducklings ran circles around their new home under the heat lamp, their flat little feet pattering on the newspaper.

Ducks are NOT chickens and ducks LOVE water. After realizing half of their allotted drinking water was used in splashing their neighbors, we set a little pan in their house so that they could play in it at their will. They took turns leaping in and swimming around, their tiny paddles furiously churning as they peeped and splashed contently. Of course, this play time was limited and there was always a life guard on duty. We didn't want any drowning to happen on our watch.

There was some inspection, but the young ducks soon learned, one at a time, that THIS was the place to be.

And they packed it in, getting the most out of their short allotted "play time".

I am assuming that I now know a little bit about being a parent. Baby ducks poop, play, demand food at very high volume, and sleep like they might be dead.

They don't hold "normal" hours like the rest of us. They eat when they're hungry, drink when they're thirsty, and peep when they feel like it it. Two AM is not the wrong time for a loud and crazy "peep show'.

But everyone grows up and wants to sleep on the roof of their house. Soon, the ducks became bigger and more experimental. One followed the other until they got their roof privileges taken away.

They usually were confined to the kiddie pool full of wood chips, but every now and then we had to change those soggy (due to excess playing) wood chips and they got to play in the bathtub while that happened.
Unfortunatly for them, the whole tub wasn't full of water. They had to be content with the plain-ol'-pool.

A few very special and well behaved duckling were even allowed outside as they grew larger (this takes about a week).

These ducks love to forage. They love collards and kale, lettuce stems and chickweed, clover and grass. After they got over the concern for their fellow ducklings they immediatly took to being out on an open range.

But after three weeks, their cute little bodies morphed into teen-age awkwardness. Their down began to turn to little rough pin-feathers. Their tails that they wag so happily like little duck-dogs were sprouting one-two-three tail feathers. Suddenly their kiddie-pool was no longer the large open circular range that they knew in their youth; they were ready to fly the coop.

Ashley, I left on the William's Island voicemail, their peeps have almost turned to quacks. It's time to take your ducks to pasture.
It was true. In the morning when we went down to greet the angry waterless mob there were some strange croaking murmurings in the crowd. They weren't exactly quacks yet, more like sick bronchitic croaks.

They're monsters, Mike said
.
They're teenagers, I said. Their voices are changing and so are their bodies. They are growing up. This is not the end, it's just the beginning of something else.

They'll never be as cute as they were, but one day they will be sleek and business-like in their new suits of feathers. They will still be the same busy ducks running from food to water, grabbing whatever weed or bug comes their way. And their big green eggs will make the most delicious custards and souffles. I just know it.
Subscribe to:
Posts (Atom)


